ZET - Astrolgy SoftwareZET - Astrolgy Software

ZET 8 Professional


Home News ZET features Downloads Manual 9 Manual 8 Registration

To install ZET 8 Professional to your computer:

  1. Install ZET 8 Lite, if it not performed yet
  2. Install your registration key
  3. Install the professional upgrade
  4. If you wish you can install additional components: World Atlas II, Big Atlases, geographical and topographical maps.
The contents of these steps described below.


Setup of ZET 8 Lite

If you still not install ZET 8 Lite, do it according instruction in a Downdoads page.


Install ZET 8 Pro or Geo key

Unlike ZET 8 Lite, for professional ZET versionns needs a registration key, you received it by email while registration. This key is differ for Pro and Geo.

The key is a file named "YourName_8Pro.exe" or "YourName_8Geo.exe".

You received a link to this file by email while registration. You should download and save this file.

Installing a key means open (run) file of key at your computer, after this an appropriate information will writed to Windows registry. This action fillfulled one-time-only while first installation of professional ZET. To install a key you should know a key's password, which you received by email too while registration.

To install your registration key you can do following steps:

  1. Open the key-file (e.g. by double-clicking the file icon). There appears the "Enter password" window.

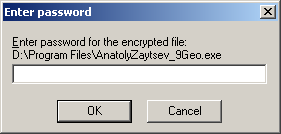
  2. Input requested "password for key" which you know.
  3. Click "OK" button. Will flash a small black window, it's right.

It will need to install a key again in cases of reinstallation a Windows system in your computer, or installation ZET in another computer.


Professional upgrade

If you have upgrade Pro to Geo, you may skip this item.

The professional version of ZET (Pro or Geo) differ from Lite by executable file zet.exe, so after installing a key it need to replace this file accordingly.

There are two variants of installing professional version: automatic and manual. The automatic variant is possible, if your key issued after 1st July 2006. The manual variant conforms in cases if your key issued before 1st July 2006 or the Auto-Update Wizard do not works properly with any reasons.

Automatic upgrade Lite to Pro or Geo:

    Attention. If your computer have an Anti-Virus Scaner or FireWall checking an Internet connection, then "zet.exe" application and domens "astrozet.net", "zaytsev.com", which are used while auto-update, should be listed in acception area of these programs.

  1. Run ZET (as Lite yet).

  2. If appears an invitation to upgrade ZET, click "Yes" button to invoke the Auto-Update Wizard.

  3. You can invoke the Auto-Update Wizard manually: click "Help" button and then select "Update ZET" menu item.
  4. When appears the Auto-Update Wizard window, follow it's dialog. You can press "F1" key to read User Guide.
  5. During the dialog you may asked to enter the password for professional access which you know (do not mix up it with key's password).

  6. When upgrade completed, ZET will restarted automatically just in Pro (or Geo) mode. In a headband window you can see "ZET 8 Pro" (or "ZET 8 Geo") sign and your name.
  7. Open "About" window, you can see "ZET 8 Pro" (or "ZET 8 Geo") sign, full ZET version number, your name and other registration data.

Manual upgrade Lite to Pro or Geo:

    To upgrade Lite to Pro or Geo it need only install professional executable file, as it described in "Updating ZET 8 to latest release" chapter of Downloads page.

  1. Open Downloads, page "Updating ZET 8 to latest release" chapter.
  2. Find "Download ... if you are registered Pro or Geo user" in the point 1 and go to "download" link.
  3. To a form, which appears, input password of professional access and password of your registration key, then press "Download" button.
  4. While download dialog specify a folder in which ZET located, normally it is "C:\Program Files\ZET 8\".
  5. After downloading of file of professional upgrade (about 1.5 MB in size), go to point 2 of "Updating ZET 8 to latest release" chapter.

NOTE: if you repeatedly install the Lite ZET version in you computer, and then you want to upgrade it to Professional, then before it you must install your registration key again (even it just installed).


Current updates of ZET 8 Professional

The last upgrade information you can find in News page.

When the next release of ZET 8 will issued you may also use the Auto-Update Wizard (independently of your key issue date). There will automatically installed all necessary files.

If you cannot use the Auto-Update Wizard, you may install the upgrade files manually, as it described in "Updating ZET 8 to latest release" chapter of Downloads page. At that, naturally, you must download Professional update of executable file, not Lite.


ZET 8 professional installer

You can setup a ZET 8 professional installer, contains ZET 8 Professional and all additional components, including World Atlas II (contains 200 000 cities), Big Atlases of several countries, hight resolution Geographical Maps with shoreline, rivers and administrative borders. To do that:

  1. Download the installer (the link was reported to you in registration message).
  2. Open (run) this file. Follow the dialog.
  3. No need to read information part, it's only for CD installation. You should only specify a path to folder, where you wish install a program. By default this is "C:\Program Files\ZET 8\"
  4. Take into account, if you just installed some updates more newest, then professional installer, then you should setup these updates again manually.

Toppgraphical Map

For ZET 8 Geo the topographical map is accessable. If you have 3.5 GB of hard disk free space, you can setup a topographical (relief) map (it is optional: basic functions of ZET will not suffer whithout it).

To install the topographical (relief) map, do following:

  1. Download the Toppgraphical Map installer (the link was reported to you in registration message).
  2. Open this file. When a dialog appears, specify a path to main ZET folder, e.g., "C:\Program Files\ZET 8\", click "Install" button.
  3. Run ZET, click "Settings", "Geographical Map Settings", check on a "Relief (topographical)" option.

ZET 8 Geo CD

If you ordered ZET CD, then the installation procedure of full ZET is simplest. Appropriate manual contains in README file on this CD.


Home News ZET features Downloads Manual 9 Manual 8 Registration